You Are Leaving Money On The Table If You Have Poor Google Ranking & Low CTR. The #1 Easiest & Quickest Way To Fix This Is To Optimize Your Shopify Meta Tags.

Do you ever feel like you're doing all this work to make your Shopify store look great, but you're not seeing any results in terms of traffic or conversions?
You might be overlooking one important thing - optimizing your meta tags!
As one of the fundamentals of on-page SEO, meta tags are essential to your ranking and visibility on Google.
In this blog post, I'll show you 2 ways to optimize your Shopify meta tags:
- Manually (in the Shopify Admin)
- Automatically (with the help of our robust Shopify SEO app ReRank), which is the easiest and quickest way to create SEO-friendly meta tags.
So read on and start seeing better results today!
Overview
- A quick reminder: What are meta tags and why are they important?
- How to manually optimize your meta tags in Shopify?
- How to automatically optimize your meta tags with ReRank?
- Conclusion
A quick reminder: What are meta tags and why are they important?
Meta tags (meta titles and meta descriptions) are HTML elements that tell Google what your pages are about.
They appear on the SERPs (Search Engine Results Pages) as titles and descriptions of your pages.

Meta titles have a direct impact on your ranking.
Meta descriptions, on the other hand, aren’t a direct ranking signal.
However, engaging meta descriptions will entice customers to click on your links, which will increase your CTR (click-through rate), which is not only a ranking factor, but also one of the most effective ways to drive meaningful traffic to your store.
As such, meta descriptions are an important component of your on-store SEO.
This means that, similar to meta titles, they impact your ranking and visibility on Google, as well as the quality of the traffic your organic listings generate.
Having said all that, we can conclude that you must optimize both your meta titles and meta descriptions.
You can do this manually or automatically.
Let’s have a closer look at each approach!
How to manually optimize your meta tags in Shopify?
First, let’s explore the manual approach - optimizing your meta tags in the Shopify admin.
Keep in mind that this is a time-consuming process that requires high levels of SEO expertise and creativity.
Therefore, if you don’t have the resources to do it in-house, you will have to outsource it to an SEO agency, which can be expensive (especially for larger catalogs).
Ultimately, you have to optimize the meta tags of all pages in your store:
- Homepage
- Collections
- Products
- Blogs
- Articles
Each page should have unique and SEO-friendly meta tags.
Important:
The purpose of this article section is to show you where to find the meta tags fields for each page in the Shopify Admin.
For more advice on writing SEO-friendly meta tags, please, refer to Part II of our on-page SEO best practices guide.
Or, you can also watch this awesome video providing extra helpful insight into the process:
How to optimize your homepage meta title and meta description in Shopify?
Open your Shopify Admin > Online Store > Preferences > Title and meta description.
Write your new homepage title in the “Homepage title” field.
Write your new meta description in the “Homepage meta description” field.
Click “Save.”

How to optimize your collection pages meta tags in Shopify?
Open your Shopify Admin > Products > Collections > Click on the collection which meta tags you want to edit > Scroll down to the “Search engine listing” section > Click “Edit website SEO.”
Write your new collection page meta title in the “Page title” field.
Write your new collection page meta description in the “Meta description” field.
Click “Save.”

How to optimize your product pages meta tags in Shopify?
Open your Shopify Admin > Products > Click on the product which meta tags you want to edit > Scroll down to the “Search engine listing” preview section > Click “Edit website SEO.”
Write your new product page meta title in the “Page title” field.
Write your new product page meta description in the “Meta description” field.
Click “Save.”

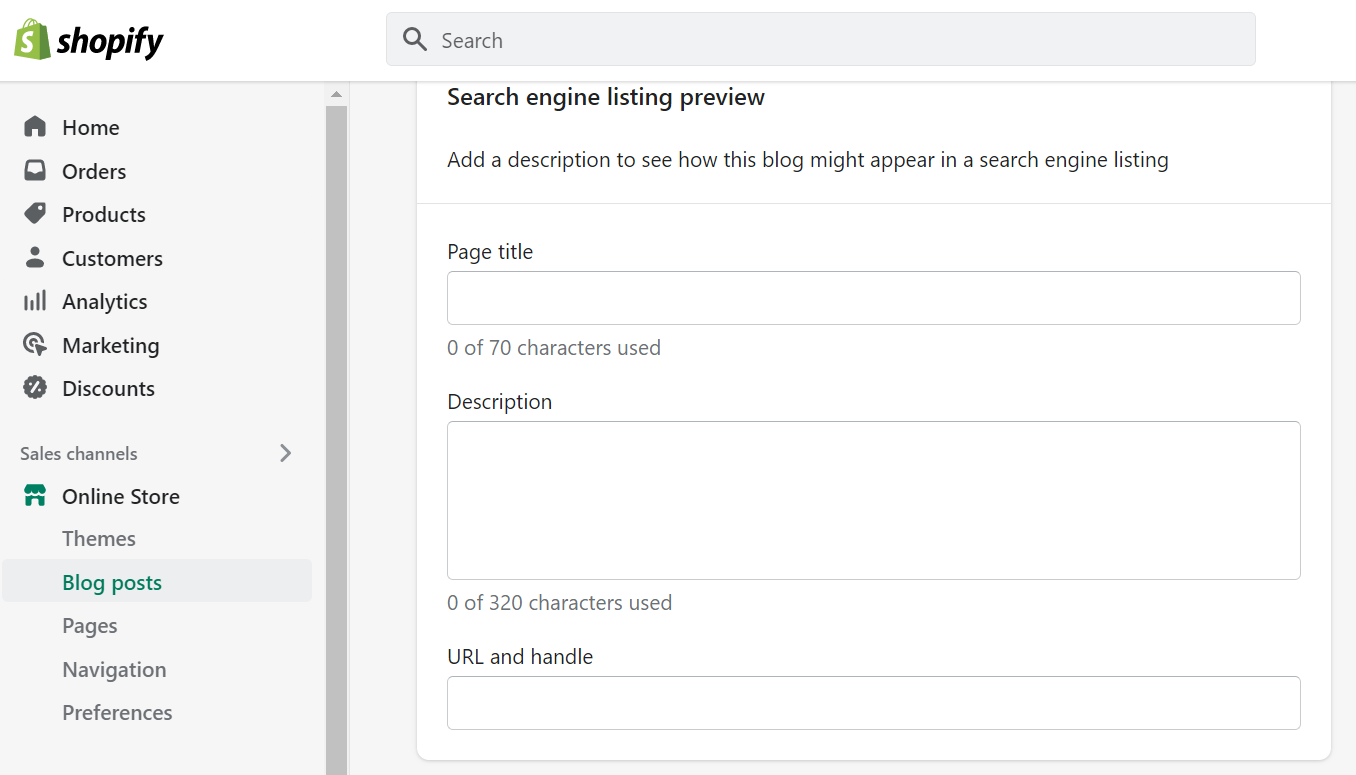
How to optimize your blog page meta tags in Shopify?
Open your Shopify Admin > Sales channels > Online Store > Blog posts > Manage blogs > Click on the blog which meta tags you want to edit > Scroll down to the "Search engine listing preview" section > Click “Edit website SEO.”
Write your new blog page meta title in the “Page title” field.
Write your new blog page meta description in the “Description” field.
Click “Save.”
How to optimize your article pages meta tags in Shopify?
Open your Shopify Admin > Sales channels > Online Store > Blog posts > Click on the blog post which meta tags you want to edit > Scroll down to the “Search engine listing preview” section > Click “Edit website SEO.”
Write your new article meta title in the “Page title” field.
Write your new article meta description in the “Description” field.
Click “Save.”

As you can see the process of manually optimizing your meta tags can become extremely complex and time-consuming.
Especially if you have more products or have already published a ton of articles on your website.
In addition, it requires you to have good knowledge of SEO best practices.
So, unless you have the right expertise, I advise you to choose the automatic approach.
This means that you should find a robust Shopify SEO app that can optimize your meta tags automatically.
ReRank is one such app and in the next section of the article I will show you how to enable the Autopilot feature and let the app take care of the entire meta tags optimization process (without any further involvement on your end).
How to automatically optimize your meta tags with ReRank?
As promised, in this section, I will show you how to enable ReRank’s Autopilot feature.
The process is extremely easy and quick - it takes 5 clicks and about 30 seconds.
So, the first thing you need to do is open your app’s admin and click “Autopilot” (in the navigation menu).

Then you need to turn the “Meta Title Optimizer” and the “Meta Description Optimizer” on.
Note that you have two options to automatically optimize your meta tags with ReRank - you can “Let the app decide” (this is the default setting and it means that the app will use a template that follows proven best practices and industry guidelines) or create your own template (using the available terms).
If you’re new to SEO, we advise you to use the option “Let the app decide.”
This will give ReRank more control over the optimization process and will ensure you get the best possible results.
Once you have specified your preferences, click “Save.”
And that’s it! ReRank will take care of the meta tags optimization process from there. (Sidenote: To leverage the entire functionality of the Autopilot, make sure that the "Image SEO Optimizer" and the "Broken Links" are also enabled.)
As you can see, the process requires no coding skills, no previous SEO knowledge, or any external help whatsoever.
Please note that after you enable the Autopilot, it will take up to 24 hours for the updates to become visible in your app’s Reports tab and on the main dashboard (where you can see your SEO score, the total number of SEO fixes ReRank has performed, and how much the app has saved you in SEO optimization costs).
Just for a reference, so far, ReRank has saved merchants over $2M (across stores), meaning that it has saved each merchant around $10K in SEO optimization costs.
For more information about the Autopilot and getting started with ReRank, please, refer to the Quick Start video you will find on your app’s dashboard.
Of course, if you need further assistance, don’t hesitate to reach out to us, so that we can address your concerns and unblock your challenges.
Conclusion
There you have it! Two methods for optimizing your meta title and meta description tags in Shopify.
If you want to DIY, then head on over to the Shopify Admin panel and get started.
But if you want a set-it-and-forget solution that will automatically optimize your tags (plus a whole lot more), then sign up for ReRank today.
No matter which route you choose, optimizing your meta title and description tags is key to showing up higher in Google search results and getting more clicks (and customers!).
Keep these tips in mind next time you're working on your website's SEO - your future self will thank you.
And be sure to follow us for more helpful content like this in the future!